
As the school holidays draw to a close, you may be scraping the bottom of the barrel for ideas to keep them busy. Here are some fun crafty ideas and activities to help you!
Dream Catcher
Making a ‘dream catcher’ with your children kills two birds with one stone: First, there’s the symbolical/mythical idea of ‘catching’ bad dreams and/or holding the better ones to look at later. Then there’s the other benefit: They’re not overheating the lounge furniture in front of the TV.
First of all, you’ll need something round: Get hubby to twist some wire into a circle, take a strip of cardboard (about 5cm wide), shape it into a circle and paste into position. I was even wondering if you could take a wire hanger and force it into a circle because you automatically have a hook to hang it up with once it’s finished.
Then you take wool – as much/little as you like and twist it around the circle like a cobweb. If you’re a bit OCD you could work out a zig-zag pattern. For the one pictured, I used a tiny bangle (ring/button) and threaded the wool through that before going to the edge again. If you’re using cardboard, make holes evenly spaced around the edge and use a needle to thread the wool through.
Finally, get hold of ribbons, lace, strips of wool, if you like, or even strips cut from plastic bags, and attach them to the bottom (make a knot, use a stapler, whichever you prefer). My daughter still decorated hers with beads, glitter and pictures. We threaded a few feathers through them, pasted a little mirror here and there and even a bell. When the wind catches these they reflect or turn so that you get a new look every time. Don’t make them too heavy because it’ll weigh the whole thing down, forcing it out of shape (and it won’t move in the wind).
Last, but not least, you could add a few treasures into the circle itself – here we have a butterfly (mom), a bee (dad) and a ladybird (for a little girl!). Create a hook of sorts to the top and hang it where desired.

Wooden Spoon Characters
As the holidays draw to a close we’ve planted seedlings, baked (sweet AND savoury), puzzled, painted, coloured and moved “Mommy I want to watch TV” well and truly out of the way… what next?
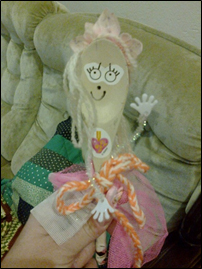
My salad servers, of course! First paint them any colour you like, so that they don’t look too naked. The paint needs to be well and truly dry before tackling the next step. Then you get Mom to draw a face (face was there, but when stickers were discovered) – how about googly eyes? Wool for the hair, pasting as much wood glue onto the back of the spoon as you can. The wool will have to be cut beforehand. Finally, we move to the scrap material box and pick ’n choose. Blue for Dad, red for Mom and pink for little girls. Tie a ribbon around it and you’re done! If the clothes insist on slipping down, a drop of glue won’t hurt. Some craft shops have little hands for sale, sometimes sold as buttons. So we drilled a little horizontal hole through the spoon at shoulder height for one pipe cleaner and twirled hands onto Goldie Locks. Perhaps you could do this for feet too, if you’re lucky enough to find a pair.
These were so much fun, we’ve also made Grandpa and Grandma! The salad servers work best because one of the spoons ends up with a natural brush cut.
Collage for Toddlers
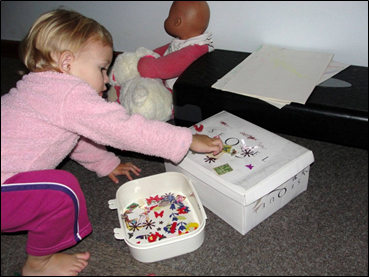
There are many reasons mothers of toddlers need to love contact plastic – the book covering that’s got glue on the one side. Take a sheet of paper (or a page of a scrapbook, if you’re filling one of those) and cut the contact to the size of the page, with an additional 5cm on both sides horizontally. Then fold the extra 5cm so that it makes contact with the paper and leave the sticky side up. Now your toddler can put anything s/he wants to onto that side. It becomes an amazing collage of feathers, magazine pictures, stamps, beads, pieces of wool or material and felt. Once the collage is done, you take another sheet of contact and paste it over the collage. If you really would like to extend the activity, you can page through a magazine with your toddler beforehand so that s/he can choose the pictures to paste onto the collage (which you cut out). Another option is to take pictures your child has coloured, cut them out and allow these to be pasted into the collage as well. In the picture the box has contact on it (as described above) and my daughter is placing bits and pieces all over it as decoration. Once she’s done, I am going to take contact and cover the box. Boxes are fun for toddlers too because they can put their ‘treasures’ into them, or turn them into cradles.
Recycled Reader
This is for those who have REALLY small children and can’t afford board-books and/or would prefer to make something for the child. Cut cereal boxes, tea boxes, egg boxes – you name it – to size (all pretty much the same size, not too large for little hands to hold). Then punch holes into the one side and use string to tie it all together; like a booklet. In this way you get most animals (we had a tiger, monkey, rooster, seal, (laughing) cow and a dog) and plenty of new words to learn, e.g. ‘rusk’, ‘milk’, ‘milk jug’ and for ‘Five Roses Tea’, you could even teach some counting skills.
Textures for Tweenies
At this age, children are very much into the tactile… and what Jean Piaget (child psychologist) called the “oral phase”: Everything needs to be experienced via the mouth.
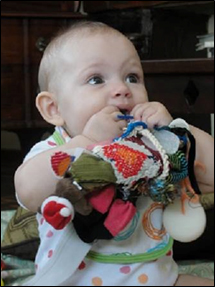
In order to show the child some of the textures available in the world, you can take a sock (because it can be filled, in this case with a roasting bag that crackles when little hands scrunch it) and sew all sorts of goodies onto it. Something soft and fluffy, something stiff or rough, velvet, or a sheer fabric. When you sew the top of the sock up (because you don’t want the child to access that plastic bag) you might want to attach a bell to it, or a little holder with a few stones to create a rattle. I’ve made it quite colourful to hold the child’s attention… and since it’s going to go into the mouth, all the materials need to be machine washable.
By Ilze Brüggemann.